Introduction
In today's digital world, live streaming has become an essential tool for businesses, content creators, and individuals alike. With the increasing number of viewers tuning in to watch live streams, it's crucial to optimize the streaming experience and cost for everyone, regardless of their internet speed or device capabilities. One effective way to achieve this is through live streaming transcoding, a process that can help reduce bandwidth and save costs without compromising on video quality. In this blog, we'll explore the benefits of using Oryx for efficient live streaming transcoding and how it can lead to significant cost savings.
Live streaming transcoding involves converting a live stream from Oryx using FFmpeg into various bitrates and resolutions, before pushing it back to Oryx. This process allows for a reduction in bandwidth while maintaining the same quality, simply by lowering the bitrate of the stream. As a result, the overall viewing bandwidth is decreased, leading to cost savings for both the streamer and the viewer.
For instance, consider a live streaming scenario with 10,000 viewers all watching the same 2Mbps bitrate stream. By transcoding the stream to 1Mbps, the required bandwidth is reduced to 10Gbps, resulting in a 50% cost saving. This not only benefits the content provider but also ensures a smoother streaming experience for viewers with varying internet speeds and devices.
Stay tuned as we delve deeper into the world of live streaming transcoding, and learn how to harness the power of Oryx to optimize your streaming experience and save costs.
Step 1: Create Oryx by One Click
Creating an Oryx is simple and can be done with just one click if you use Digital Ocean droplet. Please see How to Setup a Video Streaming Service by 1-Click for detail.
You can also use Docker to create an Oryx with a single command line:
docker run --restart always -d -it --name oryx -v $HOME/data:/data \
  -p 80:2022 -p 443:2443 -p 1935:1935 -p 8000:8000/udp -p 10080:10080/udp \
  ossrs/oryx:5
After creating the Oryx, you can access it through http://your-server-ip/mgmt via a browser.
Step 2: Publish a Live Stream to Oryx
You can use OBS or FFmpeg to publish a live stream to Oryx. You can also set up HTTPS and publish via WebRTC.
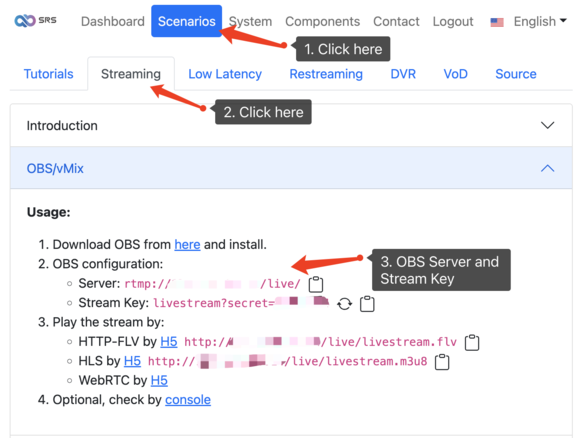
Once the stream is published, you can preview it using an H5 player or VLC. Please see How to Setup a Video Streaming Service by 1-Click for detail.
Step 3: Transcode the Live Stream to Lower Bitrate
Suppose you've sent an 8Mbps stream to Oryx using OBS, and you can't adjust the bitrate in OBS. This could be because the stream is published by a vendor you can't control, or you need to record the original high-resolution stream, or some devices like 4K/8K TVs require the high-resolution stream.
However, most of your viewers watch the live stream on mobile devices, and they don't need an 8Mbps stream. A 2Mbps stream is sufficient for mobile devices, and their bandwidth may only support a 2Mbps bitrate. In this case, you can use transcoding to convert the 8Mbps stream into a 2Mbps live stream.

After transcoding the stream, you can preview the 2Mbps version or forward it to another live streaming platform. See Easily Stream Your RTSP IP Camera to YouTube, Twitch, or Facebook for more information. You can also pull the RTMP stream from Oryx and forward it elsewhere.
Check Transcoding Status
You can check the transcoding status in the Oryx dashboard.
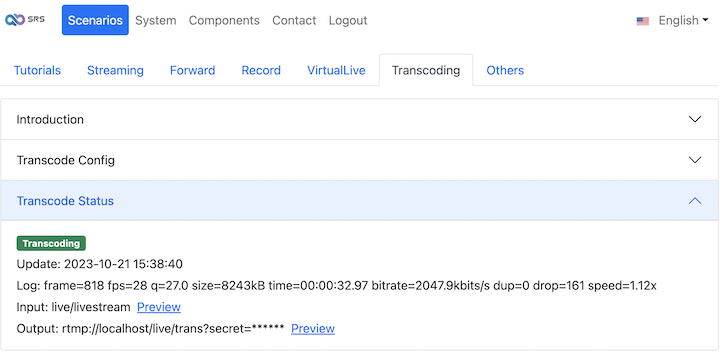
You can click the preview link to check the transcoded stream, or forward it to another live streaming platform. See Easily Stream Your RTSP IP Camera to YouTube, Twitch, or Facebook for more information.
Cloud Service
At SRS, our goal is to establish a non-profit, open-source community dedicated to creating an all-in-one, out-of-the-box, open-source video solution for live streaming and WebRTC online services.
Additionally, we offer a Cloud service for those who prefer to use cloud service instead of building from scratch. Our cloud service features global network acceleration, enhanced congestion control algorithms, client SDKs for all platforms, and some free quota.
To learn more about our cloud service, click here.
Conclusion
In summary, we discussed the benefits of live streaming transcoding using Oryx and FFmpeg. Transcoding optimizes streaming for viewers with different internet speeds and devices, reduces bandwidth usage, and saves costs. We covered setting up Oryx and FFmpeg, creating a configuration file, and pushing transcoded streams back to Oryx. Monitoring and adjusting settings is crucial for optimal viewer experience, and transcoding can also convert high-resolution streams to lower resolutions for mobile devices.
Contact
Welcome for more discussion at discord.
![]()